Getting Started
Installation
First, let's install the latest v2 build.
- npm
- Yarn
- pnpm
npm install msgroom@nightly
yarn add msgroom@nightly
pnpm add msgroom@nightly
The nightly builds get updates all the time which could contain breaking changes. These builds can also be unstable, so use them at your own risk. (Generally it's fine though.)
API documentation
Before we start, you should know everything in this library is fully typed and most things have TSDoc comments explaining what they do. If you want to know what something does, hover over it in your IDE or find the associated documentation on it here.
The TSDoc comments and types are also used to automatically generate the API docs, which you can find under the API section in the sidebar to your left. We will link to these API docs a lot.
When you are on one the pages of the API docs, it might look overwhelming at first, but don't worry, it's not as complicated as it looks at first. You can use the sidebar to your right or the search feature in the top right corner to find what you're looking for.
Creating a client
First, create a new Client.
You can provide a name, one or more prefixes (can also be a regular expression instead), and some options.
You can also set the prefix to an empty string ("") to disable the command system completely.
We highly recommend reading through the list of options and fine-tuning them to your own needs. Not doing this can be a common pitfall.
- One prefix
- Multiple prefixes
import Client from "msgroom";
const client = new Client("TestBot", "!", {
    // options here
});

// insert some very cool commands here

await client.connect();
import Client from "msgroom";
const client = new Client("TestBot", [ "!", "test!" ], {
    // options here
});

// insert some very cool commands here

await client.connect();
Defining commands
Don't create your own help command, there already is a built-in one.
Some example commands:
client.commands.ping = {
    description: "Replies with Pong!",
    handler    : () => "Pong!",
};

client.commands.repeat = {
    description: "Repeats what you said.",
    handler    : (context, ...args) => {
        return args.join(" ");
    },
};
As you can see, a command consists of a handler which takes context
and a number of arguments passed by the user when calling the command.
You can also add a description, aliases and subcommands. More info on metadata here and more on subcommands here.
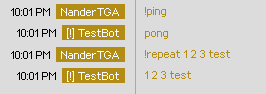
Usage
You can use commands by sending a message like this:
Blocking users
To block a user, add their ID or session ID to client.blockedIDs
or client.blockedSessionIDs respectively.
You can then check if a user is blocked using client.isBlocked().
Any events caused by blocked users will be ignored, so you likely won't need this method.
An example:
client.isBlocked("bad-user-id", "some session id"); // false
client.blockedIDs.add("bad-user-id");
client.isBlocked("bad-user-id", "some session id"); // true